Getting Started with Ultralight Aviation
Choosing the Right Flight School
Most pilots spend months choosing an aircraft, yet pick a flight school based on proximity alone. That is a mistake. Your entire microlight flight experience hinges on the instructor’s ability to read the sky and your own limits.
I once watched a student switch from a school that rushed circuits to one that drilled forced landings. The change was immediate! In South Africa, where afternoon thunderstorms build without warning, a school that schedules around weather rather than against it is worth every extra kilometre of travel.
Essential Clothing and Equipment
Expect a temperature drop of six degrees for every thousand metres you climb. On the Highveld, that rule decides what you wear. A cotton T-shirt will not save you. Wear a long-sleeved shirt with a collar and tuck it in. Closed shoes with thin soles let you feel the rudder pedals.
Your ears take the worst of it. Wind noise at 80 knots makes conversation impossible. A headset with an intercom costs as much as a set of tyres, but it transforms the microlight flight experience. Sunglasses should wrap around the sides, not for looks, but because the prop blast dries your eyes.
- Water, at least one litre
- A buff or bandana
- A lightweight waterproof layer
- Sunscreen and lip balm
The dry Highveld air cracks lips long before pattern altitude, which is why sunscreen sits at the top of the bag.
Understanding Aircraft Types
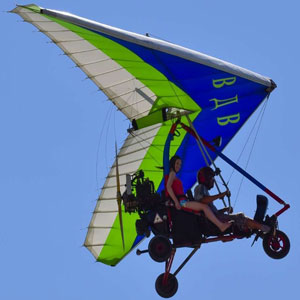
Your flight school has two aircraft on the line. One has a cockpit and doors. The other is a frame with a sail. Your choice shapes every hour of training. In South Africa, ultralight aviation splits into fixed-wing and weight-shift trikes. Fixed-wing uses a control column. Trikes respond to body movement. Each delivers a distinct microlight flight experience.
- Fixed-wing: stable in turbulent air
- Trikes: wider visibility and lower maintenance
Weight-shift takes a few hours to feel natural. Your hips become the input. Fixed-wing feels familiar to anyone with car instincts. Neither is safer, only different. Fly both before you decide.
Basic Flight Maneuvers Overview
The first time you push the control bar forward, the ground rushes up faster than you expect. That moment defines the start of your microlight flight experience. Basic flight maneuvers are the foundation, not the show.
You master four essentials: straight-and-level, climbs, descents, and turns. Each requires coordinated inputs, especially in a weight-shift trike where your body weight commands the wing. I still remember my instructor shouting, “Feel it through your hips!” Fixed-wing aircraft respond through the column, but the principle stays identical.
- Straight-and-level: trim the nose and hold heading
- Climbs: add power and pitch for a stable rate
- Descents: reduce power, maintain airspeed
- Turns: bank, coordinate rudder, and look for traffic
South African winds, from the Cape Doctor to Highveld gusts, will test your timing. You practice these patterns until they become automatic. Only then does the microlight flight experience open into something deeper.
Key Safety Briefing Points
Your safety briefing starts with a negotiation. The instructor explains the risks, and you must decide if you understand them well enough to proceed. That exchange is not casual. It carries the weight of every flight decision you will make. The microlight flight experience begins with this conversation.
- Inspect the wing surface for pinholes, the lines for tangles, and the fuel tank for leaks.
- Memorise the wind limits and the maximum gust spread for your aircraft type.
- Identify two emergency landing fields outside the airfield boundary before every takeoff.
The briefing stresses that a clear mind is your best instrument. South African conditions, from the Cape Doctor to Highveld thunderstorms, force you to stay alert. That clarity, not the throttle, determines your success.
What to Expect During Your First Aerial Adventure
Takeoff and Climb Dynamics
The moment the throttle opens, your microlight flight experience shifts from a checklist to a physical reality. Nearly 60% of first-timers feel the acceleration harder than expected, yet it stays smooth. The aircraft rolls forward with purpose, and within seconds, the wheels release the runway.
As the nose lifts, the horizon drops. You feel the airframe take the weight, and the climb begins at a steep but controlled angle. Wind noise rises, and the view expands. Below, the landscape becomes a grid of fields and roads. Watch for three physical cues:
- A push into the seat from the climb attitude.
- A drop in air temperature.
- A change in engine tone.
Then the climb settles into a rhythm. The aircraft finds a stable ascent, and the world tilts into a slow panorama. This is the essence of a microlight flight experience, a quiet suspension between earth and sky.
Handling the Controls with Confidence
The first surprise of a microlight flight experience is how little force the controls need. A slight pressure on the stick, a slight push on the rudder, and the wing responds. You sense resistance through the controls. That feedback builds certainty.
Your instructor will guide you through gentle turns and a slow descent. You learn to scan the horizon, not the instruments. The wind carries you past the Magaliesberg, and the aircraft follows your inputs. Confidence arrives in small repeated successes. Each correction teaches you how the wings react.
- Keep your eyes fixed on a point ahead
- Breathe slowly from your stomach
- Move the controls with small deliberate gestures
Soon the controls feel natural. The first aerial adventure shifts from a lesson to a real flight.
Scenic Highlights and Navigation Tips
The Magaliesberg range dates back over two billion years. On your microlight flight experience, you see those ancient ridges from a perspective unavailable on foot. The Hartbeespoort Dam appears to the east, and the Cradle of Humankind stretches below in layered greens and browns. What a view that is!
Navigation relies on obvious landmarks. Water towers, dirt roads, and the Crocodile River curve become your reference points. Your pilot identifies features that shift with the seasons.
- White water tower on the dam’s northern shore
- Red rock cliff on the western ridge
- Railway line following the river’s bend
Glance down often, but keep your eyes moving toward the horizon. Each pass over the valley reveals new detail. The landscape becomes a sequence of recognized shapes, not a blur. Your first aerial adventure ends with a mental map you did not have before landing.
Landing Approach and Touchdown
The landing approach is where the microlight flight experience gets personal. The airfield appears small, then suddenly enormous. Your pilot lines up with the strip, and the engine note drops to a conversational hum. The ground rushes upward, but not in a frightening way. It feels deliberate.
- Check the windsock for a last-minute gust
- Feel the flare as the nose rises
- Wait for the wheels to meet the ground
The touchdown itself lasts two seconds. The aircraft settles, the tail drops, and you roll forward. It is anticlimactic, which is exactly what you want. A good landing is boring. That is the mark of skill.
Post-Flight Debrief and Feedback
The engine winds down, and the silence feels louder than the prop wash. The post flight debrief completes the microlight flight experience. I remember sitting in the briefing room, still buzzing from the air, while the pilot sketched our route on a tablet.
Your pilot will ask how you felt at each stage, from liftoff to the flare. If you took the controls, expect specific feedback on your inputs. They will also highlight what went well and what to revisit next time.
The debrief usually covers:
- Your decision making on approach
- Moments where you handled the aircraft smoothly
- Suggestions for your next flight
By the end, you will know exactly what you accomplished. That clarity stays with you long after you leave the airfield.
Mastering the Skills for Solo Flying
Building Your Flight Hours
Reaching solo flight typically takes between twenty and thirty hours of dual instruction in South African conditions. That first unaccompanied circuit, with the right seat empty, rearranges your priorities. Building flight hours turns the microlight flight experience into a study of consistency. You fly dawn sorties from Morningstar near Cape Town, or chase calm air over the Magaliesberg before thermals build. The routine includes:
- Pre-flight inspections completed without prompting
- Radio calls delivered without stumbling
- Weather decisions made without a second opinion
Your logbook grows in small increments. My own logbook records an afternoon when my instructor said nothing for an entire lesson, which felt more valuable than any verbal feedback. Gradually, the empty right seat becomes less a source of anxiety and more a confirmation of readiness.
Advanced Maneuvers and Techniques
Solo sign-off does not end the learning curve. It sharpens it. Advanced maneuvers turn the microlight flight experience into a precision exercise, where small errors become visible immediately.
One exercise that humbles most pilots is the steep turn. At 45 degrees of bank, the horizon tilts and your inner ear lies to you. You learn to trust the instruments and your body’s sense of motion, not the voice in your head. Another is the simulated engine failure. Practice from altitude, pick a field, fly the pattern, and commit to the landing spot. No second chances exist in reality, so the repetition matters.
- Steep turns to exact altitude
- Forced landing drills from downwind
- Slow flight with full flap
- Crosswind circuit corrections
Each maneuver builds a quiet confidence. The aircraft responds to your decisions, and you respond to its feedback. By the time the advanced syllabus ends, the microlight flight experience leaves you with a sharper sense of judgment and a deeper respect for the variables you control.
Reading Weather Patterns
The Highveld sky can change its mood faster than a cat deciding it no longer likes you. That is why the microlight flight experience demands you read weather patterns before soloing. One moment you have blue skies, the next a thunderstorm builds over the Magaliesberg. The solo pilot must interpret cumulus growth, wind shifts, and pressure trends without an instructor’s voice in the headset.
I check three things before every solo sortie:
– The day’s temperature spread. A large gap between morning and afternoon temps fuels thermals.
– Surface wind direction and gusts at nearby stations.
– Cloud base height reported by local glider clubs.
These signs turn guesswork into judgment. You do not need a meteorology degree. You need a curious eye and a healthy suspicion of the sky.
Emergency Procedures and Protocols
Emergency procedures live in muscle memory, not on a laminated card. Your pulse spikes, your thinking narrows, and your hands must already know the routine. In a microlight flight experience, the forced landing is the protocol that matters most. The engine can go quiet without warning, so you need a field picked and a glide angle locked in within seconds.
I rehearse engine failure drills before each solo sortie, three times in a row. The sequence is fixed:
- Fly the aircraft first
- Pick the landing area
- Transmit MAYDAY with position
Repetition turns that sequence into instinct. By the time the engine actually stops, you are already acting, not deciding.
Meeting License and Certification Requirements
The silence before the engine warms carries its own weight, and by the time you fly solo, you learn to read it. Mastery does not arrive through desire alone. It is earned through hours logged, errors corrected, and the strict accounting of certification.
In South Africa, the route to a solo endorsement follows a precise order. Your microlight flight experience is measured against the regulator’s requirements, and the logbook becomes the evidence. The examiner weighs your hours and the quality of your decisions under pressure.
The prerequisites are enumerated:
- A minimum number of dual instruction hours.
- A valid student pilot certificate.
- A medical declaration accepted by the Civil Aviation Authority.
Each item is a threshold. Once crossed, the aircraft is yours alone, and every flight becomes a private rehearsal for judgement.
Exploring Different Ultralight Aircraft Models
Weight Shift vs. Three-Axis Control
Every ultralight aircraft model asks a silent question: do you let the wind guide you, or do you command it through levers? That question separates weight shift from three axis control. For South African pilots, this choice shapes every microlight flight experience from the first taxi to the final flare.
Weight shift designs feel like an extension of your body. You lean into turns, your hips and feet working instinctively. Three axis models respond to stick and rudder inputs, offering precision that feels closer to traditional aviation. I have flown both, and the difference is visceral.
Here is what to expect when comparing them:
- Weight shift: quicker to learn, but physically demanding in turbulence
- Three axis: more stable in gusty conditions, with better crosswind handling
Your decision matters. A microlight flight experience over the Cape winelands becomes a test of trust in your machine’s response. Choose based on your temperament and your budget, then commit fully.
Fixed Wing vs. Flex Wing Designs
Fixed wing and flex wing ultralights manage aerodynamic loads in different ways. Fixed wing models use rigid spars and ailerons, delivering predictable roll behaviour. Flex wing designs rely on a fabric sail over an aluminium frame, which shifts with turbulence. These structural choices affect your microlight flight experience in practical ways. Considerations include:
- Fixed wing: steeper glide angles and fewer trim adjustments.
- Flex wing: faster rigging times and easier trailer packing.
Pilot fatigue, fuel consumption, and visibility all differ between the two. Fixed wing aircraft generally suit longer cross-country trips, while flex wing models offer a more direct sense of the air. Try both on a circuit and compare the feeling in your hands.
Performance and Handling Comparison
Flying a Bushbaby over the Magaliesburg ridges changed how I judge an aircraft. Each model transmits its own feedback through the controls, and that feedback shapes your microlight flight experience more than any brochure. Taxi out in a Cheetah and the nose pitches differently. The stick pressure, the yaw response, the way the seat frames your peripheral vision, all of it affects your decisions.
Some models reward a light touch, while others demand steady authority. I have flown three types back to back on the same circuit, and the differences were immediate:
- Fast wing loadings feel planted but require earlier flare timing.
- High-mounted engines produce more pitch coupling under throttle.
- Longer fuselages dampen yaw but complicate crosswind landings.
That kind of direct comparison teaches you what you actually want. The same runway, same wind, same conditions, and each aircraft asks for a different series of inputs.
Cost of Ownership and Operating Expenses
Every aircraft carries its own cost ledger, and the purchase price is only the first page. Hangarage, insurance, maintenance, and fuel accumulate quickly. In South Africa, the difference between a two stroke and a four stroke engine changes your annual budget by tens of thousands of rand. That gap directly shapes your microlight flight experience, because a cheaper airframe can still carry heavy ongoing costs.
Consider the recurring expenses:
- Annual inspection and permit renewal
- Engine overhaul reserve
- Propeller replacement cycles
- Insurance premiums based on hull value
A second hand Cheetah might cost less upfront, but its Rotax parts are expensive. A Bushbaby with a Jabiru engine offers simpler maintenance. The real expense is often the hangar and fuel. Fly often, and the operating cost per hour becomes the true measure of ownership.
Maintenance Considerations and Upkeep
The steady hum of an engine fades the moment you focus on the seams and fasteners. A microlight flight experience depends on the quiet details you inspect before takeoff. Each ultralight model carries its own maintenance personality, from the temperamental carburettor floats on older two strokes to the simple air filters on modern four strokes. I have watched pilots forget that a loose cotter pin can cancel a weekend outing faster than any weather front.
Routine upkeep protects your safety margin. Coastal South Africa brings salt air that attacks exposed metal with surprising speed. A thorough wash after every flight matters! The brake lines, the wing struts, the fuel bowl drain, they all deserve your eyes.
- Check wing attachment bolts for corrosion
- Lubricate throttle and choke cables
- Inspect the propeller hub for cracks
These small rituals shape your microlight flight experience. Neglect them and the engine sputters without warning. The best aircraft for you is the one you can maintain with your own hands, because that bond defines every future outing.
Joining the Community and Continuing Your Journey
Finding a Local Flying Club
After a few dozen hours, you will realise that the microlight flight experience extends beyond the machine. It is about the people who share the sky with you. Finding a local flying club is the next logical step, and South Africa has a vibrant network of them.
At a club, you trade your solitary circuits for a calendar packed with fly-aways, weekend breakfasts and cross-country adventures. The wisdom on offer is brutally practical, covering wind shear on the Highveld and runway etiquette at coastal strips. What membership gives you looks like this:
- Access to instructors who have seen every odd weather pattern
- Group maintenance days where you learn from someone else’s mistakes
- A ready pool of co-pilots for those long trips
Continuing your journey becomes less about chasing hours and more about mentoring the new joiners. You will find yourself explaining stall recovery over a braai, which is oddly satisfying! The club keeps you honest, grounded and engaged, long after the novelty of takeoff wears off. I have yet to meet a pilot who regrets joining one. That is how the microlight flight experience stays fresh, flight after flight.
Attending Events and Fly-Ins
Your first fly-in changes how you see the microlight flight experience. The runway fills with trikes and three-axis machines from across the provinces. Pilots swap tales of thermals over the Karoo and gusty approaches at strips you have never heard of.
These events are working weekends, not airshows. You will help tie down aircraft, refuel, and brief newcomers on the circuit. In return, you gain knowledge that takes years to accumulate alone. A seasoned pilot always knows the exact trick for a stubborn throttle cable or the safest route past restricted airspace.
Fly-ins build your logbook in ways solo hours cannot:
- Navigation exercises to unfamiliar strips
- Formation practice with experienced pilots
- Passenger flights for club charity days
Each sortie adds a different dimension to the microlight flight experience. The community keeps you honest, and the events keep you flying.
Online Forums and Educational Resources
When the airfield lights go out, the conversation moves online. South African microlight pilots gather in forums that never close, trading field reports and asking the questions you were too shy to raise at the hangar. One thread about a rough landing at a Free State strip taught me more than three months of solo practice. The digital side of the microlight flight experience runs parallel to the physical one, and it rewards those who participate.
Useful resources include:
- Accident report analyses from the CAA
- Regional weather discussion threads
- Simulator software that reinforces circuit procedures
- Maintenance videos filmed in actual local hangars
Educational material arrives as readings, video walkthroughs, and instructor commentaries. The forums bridge gaps between flight schools and solo pilots. You learn from mistakes that cost others money, time, and confidence, which makes your own microlight flight experience safer and more informed.
Building Your Own Ultralight Aircraft
Building your own machine deepens the entire pursuit. The workshop provides a different set of lessons, and the best teachers are the pilots who have already endured the process. I spent six weeks on my wing spar before a retired instructor from Rand offered a better clamping method over the phone. That kind of shared knowledge defines this community. The group expects you to bring your own effort, but they will never let you fail alone.
The practical support varies, but it always arrives when needed.
- Borrowing proven jigs instead of making new ones
- Getting honest feedback on your wiring layout
- Understanding the local paperwork for an amateur build
This work transforms your microlight flight experience. You no longer simply fly the aircraft; you know every rivet and cable within it. That intimacy changes how you handle turbulence and how you conduct your pre-flight. Your microlight flight experience becomes more deliberate, turning a hobby into a constant dialogue between you, your machine, and the sky above the Free State.
Mentorship and Advanced Training Opportunities
After six weeks of wrestling with a wing spar, I understood why mentorship matters more than any manual. The pilots who shared their jigs and their time did not hand me answers. They showed me where to look. That exchange continues long after your first solo.
New opportunities appear when you stop trying to impress the hangar and start listening to it. Advanced training in South Africa often comes through informal channels. A retired instructor might offer a weather briefing over coffee. A competitive pilot might invite you to practice crosswind landings at a quieter airfield.
What you can expect from an active mentorship group:
- Honest critique of your decision making
- Introductions to instructors who teach beyond the syllabus
- Access to structured ground school sessions
Your microlight flight experience deepens when you let other eyes see your blind spots. The same microlight flight experience takes on new weight when you guide another pilot through their own early flights.